Editing a Truss Added to the Library on the Work Plane
You can edit a truss saved in the library by opening a truss in
a building model and editing the parts on a work plane. You can
save the edited truss in the library with the same or a new
name.
- First, add the truss to the building model.
 Add Parts to a Truss
Volume
Add Parts to a Truss
Volume
- Select
 Constraints > Activate Work
Plane. Work planes in the building model are highlighted in
color.
Constraints > Activate Work
Plane. Work planes in the building model are highlighted in
color.
- Select the truss volume you added the parts to.
- Select Confirm.
The dimension constraints added earlier to the work plane will
be displayed.
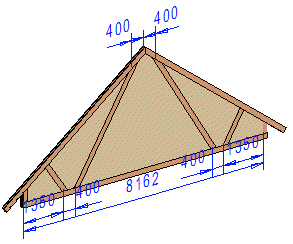
- Rotate the model until the volume is perpendicular. Select
Projection > Select From Model, for example, and select
the truss volume.
- Edit the truss on the work plane. You can add and delete
profiles, joints and geometric constraints in the same way as when
modeling a truss.
- After finishing the truss, close the work plane. To do this,
select Constraints >
 Close
Work Plane.
Close
Work Plane.
- Select
 Trusses >
  Generate Parts.
- Select the truss volume in which you edited the truss.
- Select Confirm. The Truss Structure dialog box opens.
The parts of the modeled truss are displayed in the preview
window.
- Select a customer-specific library from the Libraries
list.
- Click Save to library. The Truss library dialog box
opens.
- Define the library data of the truss in the dialog box. Name
the truss.
Library Data of a
Truss
If a truss exists with the same name, you will be prompted: Replace
it? Select either of the following:
- Yes - The edited truss will replace the old truss with
the same name.
- No - You can rename the truss in the Truss Library
dialog box.
- Confirm by clicking OK.
Modeling a
Truss
Saving a Truss to the
Library
 Truss Libraries