Framer, Floor Framing & Rafters

Adding a sheet

This function can be used to add a single sheet to the sheathing area. The sheet material is determined according to the sheathing properties, so you will first need to determine the sheathing properties using the Add a sheathing function.

  1. Select Floor Joists, Roof Rafters > Sheathing > Add Sheet.
  2. Select the method of selecting the structural layer, and select the structure and the structural layer (type SHEET).

    Selecting structural layer

  3. Select the sheet code, which determines the sheet size and other properties, in a dialog box.

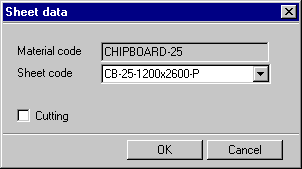
    When you select the Cutting check box, a sheet added to the edge of the area is automatically cut according to the area.

  4. If necessary, change the direction of the sheet in the following way:
    1. Right-click to open the context-sensitive menu.
    2. Select one of the following:
      • Vertical
      • Horizontal
      • Default (the rising direction in an inclined plane)
      • Select direction
        1. Select the start point of the direction line.
        2. Select the end point of the direction line.
  5. If necessary, change the reference point of the sheet in the following way:
    1. Right-click to open the context-sensitive menu.
    2. Select Reference point.
    3. Select one of the nine radio buttons in a dialog box. The radio buttons refer to the sheet points:
  6. If there is a framing in the horizontal structure, you can lock the cursor in the direction of a joist in the following way:
    1. Move the cursor near the joist.
    2. Right-click to open the context-sensitive menu.
    3. Select Constrain to piece .
  7. Select the location of the sheet.
Note

Sheathing

Converted from CHM to HTML with chm2web Pro 2.85 (unicode)