Search criteria
The component search criteria is formed of a parameter and its
comparison value, for example:
PARAM1 = 100
PARAM1 is the parameter
= is the comparison operator sign
100 is the parameter's comparison value
The comparison operator may be one of the following:
| = |
Equal to |
| <> |
Not equal to |
There can be several parameters, allowing you to use two logical
operators in the definition of the search criteria: and or
or.
- and - The component will be changed if both the
comparison conditions are true.
- or - The component will be changed if either of the
comparison conditions is true.
For example: USE = "ROOF" and PARAM2 <> 0
If the comparison value is a text, it will be displayed inside
quotes.
Define the search criteria as follows:
- Click the Select button. The Available parameters
database view opens. The view presents the available parameters for
components of the selected object type. All values used in the
building model are displayed for each parameter, which means that
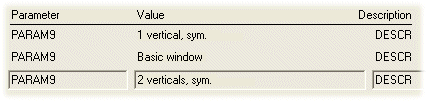
the same parameter may appear on several rows. For example, a
window description text PARAM9:
- Move the cursor onto the desired row with the arrow keys and
click the OK button to accept the selection.
- If necessary, edit the comparison operator in the Search
criteria field.
- If you wish to use more than one parameter in the search
criteria, you must first select either of the logical operators:
and or or.
-
Select a second
parameter and its value with the Select button etc.
Classification Search Criteria
You can also search for a component on the grounds of the
classification. The classification search criteria is formed of the
classification's type and name, for example:
COMP_USE = "TERRACE"
COMP_USE is the classification type
= is the comparison operator sign
TERRACE is the classification
The comparison operator may be one of the following:
| = |
Equal to |
| <> |
Not equal to |
There can be several types, allowing you to use two logical
operators in the definition of the search criteria: and or
or.
The same classification type can appear several times in the
search criteria and receive different values, for example:
COMP_USE = "U1" or COMP_USE = "U2"
The classification is displayed in inside quotes. If necessary,
you can replace part of the text with the wildcard characters
question mark (?) or asterisk (*). The question mark stands for a
single character, and the asterisk stands for any combination of
characters. For example, COMP_USE = "TER*".
Define the classification search criteria as follows:
- Click the Select button.
- You can select a classification from either the classification
database (d_USE) or the classification list tree defined in the
DesignStream system (the DesignStream Interface add-on
feature).
- If necessary, edit the comparison operator in the
Classification search criteria field.
- If you wish to use more than one type in the search criteria,
you must first select either of the logical operators: and
or or.
-
Select a second type
and classification by pressing the Select button, etc.
 You cannot select freeform classifications defined for building
components by using the Select button. If necessary, you can
type the search criteria in the text field in the format:
You cannot select freeform classifications defined for building
components by using the Select button. If necessary, you can
type the search criteria in the text field in the format:
FREE_TYPE = "CLASSIFICATION"
Make sure that the type and classification are written in
exactly the same way as when you first set up the new
classification.
Further information of classifications:  Setting a
Classification.
Setting a
Classification.