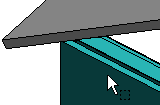
Stretch a Wall or a Layer to a Roof
You can stretch a wall or only the selected layer up to the roof
either from the top or bottom of the wall (for example, the wall of
a dormer can be stretched to the roof below). First, rotate the
model to a position where it is easy to click the correct
layer.
 You cannot stretch wall layers which you have edited in the model by using this function.
You can stretch an edited layer to a roof by moving the edges and
edge points.
You cannot stretch wall layers which you have edited in the model by using this function.
You can stretch an edited layer to a roof by moving the edges and
edge points.
- Do either of the following:
- Select a wall. You can select several walls with the Ctrl key
pressed down.
- Select the wall, and then select the layer.
- Right-click to open the context-sensitive menu.
- Do either of the following:
- If you selected a wall, select Roof >
 Stretch to Roof.
- If you selected a layer, select
Stretch to Roof.
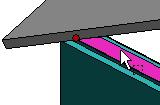
- Select the roof or slope to which the layer is to be stretched.
Select several slopes with the Ctrl key pressed down.
- Select Confirm.
- Select the edge to be stretched in a dialog box. Do one of the
following:
 Note
Note
- If you select the edge to be stretched so that it results the
wall geometry to disappear from the model, the program asks you to
confirm the selection.
- If the number of a siding layer has been defined as 15 in the
wall library, you can stretch the siding layer to the roof in the
same way as the frame volume. You can select the roof surface and
the distance of the volume edge from the roof surface in a dialog
box. A wall can only have one volume with the number 15.
- You can remove the connection between a wall and a roof by
disconnecting the wall from the roof.
 Select an Object
Quick Lock an
Object Type
Disconnect a Wall From a
Roof
Walls