Creating a Projection Detail
This function can be used to create a detail view of a designed
drawing's elements.
- The creation of a detail view begins with a partially drawn
projection, from which two or more projection areas are
formed.
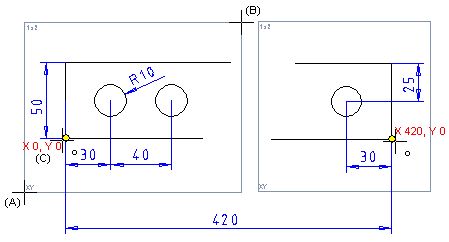
- A reference point is selected from the projection area, making
it possible to use dimensioning between the projections. The
borders of the projection area are not displayed in printouts.
- Select Views>
 Projection
Detail.
Projection
Detail.
- Define the data of the first projection area in the dialog box:
- Define the coordinates of the Reference point, for
example X 0, Y 0.
- Confirm the data.
- Click the first projection area as follows:
- Click the lower-left corner point (A).
- Click the upper-right corner point (B).
- Select the position of the reference point in the projection
area (C).
- Define the data of the next projection area in the dialog box:
- Select Scale.
- Define the coordinates of the Reference point, for
example X 420, Y 0.
- Confirm the data.
- Click the next projection area.
- Stop using the function by clicking the Cancel button in
the dialog box.
 Projection Area
Properties
Projection Area
Properties
 Note
Note
- You can toggle the visibility of the borders of the projection
area by selecting the menu bar function View> Detail View
Limits.
- The creation of a projection detail can also begin with a
whole, finished projection that is cut, for example, into two or
more projection areas.
Cutting a
Projection Detail