 Select Exterior Wall - When the function
is selected, you can select exterior walls.
 Select Interior Wall - When the function
is selected, you can select interior walls.
 Select All of Same Type - When the
function is selected, you can select all walls of the same type by
clicking one wall of the desired type. The walls are of the same
type when they have the same parameters.
  Either of the basic
wall types must be selected at the same time.
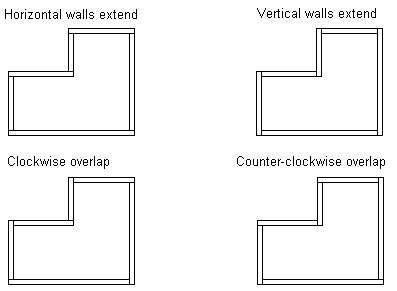
- Horizontal walls extend
- Clockwise overlap
- Counterclockwise overlap
- Vertical walls extend
Horizontal walls mean walls in the direction of the x axis in the floor plan drawing, and vertical walls mean walls in the direction of the y axis. The break points of panels that depend on the corner overlap type are displayed below.

![]() The corner overlap selected does not apply to the corners
where the framing lines of the walls have been trimmed so that the
walls are cut at the corner.
The corner overlap selected does not apply to the corners
where the framing lines of the walls have been trimmed so that the
walls are cut at the corner.

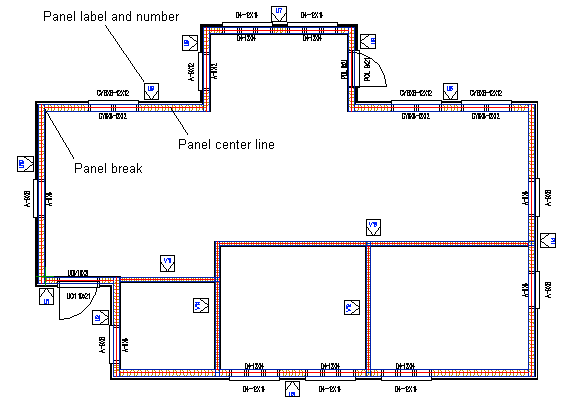
The program will mark on the floor plan drawing the center lines and break points of panels, the labels and numbers of wall panels, and the labels and sizes of openings (windows or doors).
![]() If a panel exceeds the maximum height defined in the setup
file ../custom/details or ../system/details folder, the program
will notify about this in a message box. If you do not accept the
panel height, the panel cannot be generated. You need to edit the
panel height and then regenerate the panel.
If a panel exceeds the maximum height defined in the setup
file ../custom/details or ../system/details folder, the program
will notify about this in a message box. If you do not accept the
panel height, the panel cannot be generated. You need to edit the
panel height and then regenerate the panel.
- By clicking No in the message box, you can add backers only where there are not yet any backers.
- By clicking Yes, the program removes the old backer, if a new backer is added at the same location. If there are no existing backers, it does not matter which option you select.

![]() The backer detail (its cross section size and location) is
defined in the building parameters.
The backer detail (its cross section size and location) is
defined in the building parameters.
Below is an example of a floor plan drawing after generating the panel breaks.
