|
Framer |
The electrical symbol parameters are selected in a dialog box.
Floor Plan Symbol
Select the symbol to be added to the floor plan drawing of the building from the list.
Distance from Wall
Type the distance of the floor plan symbol from the inner surface of the wall in the field.
Elevation Drawing Symbol
Select the symbol to be added to the wall panel drawing from the list. The symbols added at the back of the panel in the viewing direction are drawn with a dash line in the panel drawing.
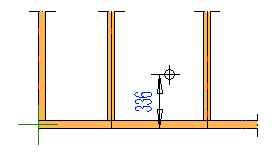
Height from Bottom
Select the distance of the elevation drawing symbol from the floor level from the list, or type a desired value in the field. Later, when you generate the panel drawing and add a dimension line for the electrical symbol, the dimension shows the distance of the symbol from the bottom of the panel.
Material Code
Select from the list.
Box width, Box depth
Type the box dimensions in the framing model to the fields.
If the NC Link feature is available to you, you can transfer the installation hole to the production control system. Select the installation hole properties:
Shape
Select either of the following as the shape of the installation hole:
Circle - Type the radius of the circle in the Circle field.
Rectangle - Type the dimensions of the rectangle in Length and Width fields.
Select either of the following as the depth of the hole:
Through - The installation hole goes through the wall panel.
Enter the depth of the hole in the text field.
![]() The hole is displayed in the panel drawing,
when you open the drawing and add NC accessories to the panel. If
you move the electrical symbol, open the panel drawing and update
update the hole's geometry by adding the NC accessories again.
The hole is displayed in the panel drawing,
when you open the drawing and add NC accessories to the panel. If
you move the electrical symbol, open the panel drawing and update
update the hole's geometry by adding the NC accessories again.
![]() Opening
a Panel Drawing
Opening
a Panel Drawing
![]() Add All
Machining Lines to a Panel
Add All
Machining Lines to a Panel
![]() Add a Dimension Line to a
Panel Drawing
Add a Dimension Line to a
Panel Drawing
![]() Wall Panel Macros
Wall Panel Macros
| Converted from CHM to HTML with chm2web Pro 2.85 (unicode) |