|
Architectural |
The roof trims to be added are selected in the dialog box.
Destination
Select Ridge, Hip or Valley as the target.
Section
Select a cross section by clicking the Prop button, which opens the Piece Properties dialog box. The parameter set as well as the parameters Type and Use of the profile are automatically updated according to the selected Target. Select the profile library and the cross section, and return to the Roof Ridge/Hip/Valley Trims dialog box by clicking the OK button.
Offset
If necessary, you can define the distance between the trim location point and the outer structural surface of the roof. The distance is measured in the direction of the half angle line of the ridge, hip or valley. When the offset is 0, the trim location point is positioned on the outer surface of the roof. Please note, that all the roof structure layers appear in the model only after the detailed representation of the structure has been selected by expanding the layers.
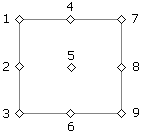
Inp.
Select one of the nine points of a rectangular drawn around the cross section as the location point. See the figure below.
Cut
When the value is 0, the trim will be added as in the length of the ridge, hip or valley. You can shorten the trim from both ends by entering the desired value in the field.
| Converted from CHM to HTML with chm2web Pro 2.85 (unicode) |