- Select
 Trim Boards >
  Roof-to-Wall Flashing.
 - Right-click to open the context-sensitive menu, and select
Trims > Roof-to-Wall Flashing.
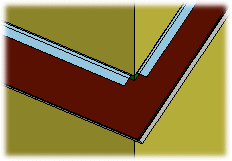
You can add flashing to the joint between the roof and the wall. The flashing may extend over several stacked walls and over several roof slopes. Before adding the flashing, change the roof representation method to detailed representation by expanding the different layers of the structure visible in the 3D model.
Roof-to-Wall Flashing. Roof-to-Wall Flashing.
![]() Delete a
Flashing
Delete a
Flashing
![]() Expand Layers
Expand Layers
![]() Connections to the
Intersection Points
Connections to the
Intersection Points
![]() Trim Boards
Trim Boards
![]() Editing
Keywords
Editing
Keywords
| Converted from CHM to HTML with chm2web Pro 2.85 (unicode) |