Adding a Single Eave Macro
When you open a roof layout, the program adds eave macros
automatically to it. If it is a complex roof, part of the
automatically added eave macros may be incorrect. You can remove
the incorrect eave macros, and add new macros one by one.
- Do either of the following:
- Select
 Roofs > Roof Siding Material Layout
Tool >
Roofs > Roof Siding Material Layout
Tool >  Add Eave Macro.
- Select the function in the project's document browser:
- Open the branch Architectural documents / Roof
layout.
- Move the cursor on a name of a roof layout, for example
roof_layout.
- Right-click to open the context-sensitive menu.
- Select Add Eave Macro.
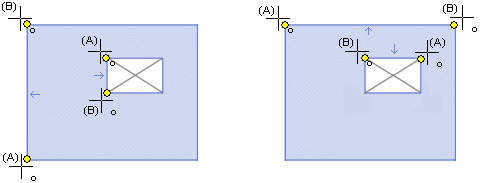
- Select the roof.
- Select the start point of the eave (A).
- Select the end point of the eave (B). The order in which the
points are selected defines on which side of the eave the macro is
added.
- Select one of the following as the eave type:
- Ridge HA
- Hip UT
- Valley ST
- Gable eave PR
- Side eave SR
- Eave against a side wall SS
- Eave against a gable wall PS
 Opening a Roof
Layout
Opening a Roof
Layout
Deleting an Eave Macro
 Roof Layouts
Project Document
Browser