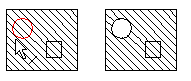
You can add holes to hatching by clicking the hole edge lines one by one. This requires that there are edge lines to one or more holes.
The edge line of the hole must be a closed line.
![]() Select the hatch and the context-sensitive
function Hole to Hatch>
Select the hatch and the context-sensitive
function Hole to Hatch> ![]() Add
Hole to Hatch.
Add
Hole to Hatch.
You can add a hole in a hatch, when you have drawn the hole as a closed edge line.
![]() Hatch Dialog
Box
Hatch Dialog
Box
![]() Adding Holes to Hatching
Automatically
Adding Holes to Hatching
Automatically
| Converted from CHM to HTML with chm2web Pro 2.85 (unicode) |