Creating a New Option
Use this function to add options to the floor plan. You may add
as many options to the floor plan as needed. You may have more
options in the Options database than are used in the project, but
only options that are defined on the plan will be solved.
Before selecting the function, open the appropriate
drawing-model pair for the option addition. Add the options in the
following way:
- Select
 Option System > Create
New Option.
Option System > Create
New Option.
- Select all objects that you wish to add to the option.
- Select Confirm.
- Select an origin point, i.e. a point that you will use as a
locating point for the option. Select a point that will not
interfere with any other option location. The system will add a
marker to the selected location.
- Select the option conditions in the Option Condition for
Components in Option Box dialog box.
 Option Condition
for Components in Option Box Dialog Box
Option Condition
for Components in Option Box Dialog Box
- Select the location for the option box. If necessary, lock the
cursor in the x or y axis direction. The cursor is locked to move
through the selected locating point. Place the option box far
enough away from the floor plan drawing that it will not interfere
with the current plan's notes, dimensions, and other
documentation.
The program copies the objects you selected to an option box
with the option id Default. It also adds another option box
with the option id you selected to the drawing. This box is empty,
as the objects of the option are to be modified on the actual
building. You can now modify the objects to design the option. You
can add, delete or trim walls, for example. One of the major
features of options is to create optional elevation conditions that
you can use to create a number of different styles.
 Note
Note
- When you have designed the option, associate the new objects to
the option definition with the function Editing Option Components.
- To solve an option correctly, all drawings that are affected by
the option must be modified. In other words, if a fireplace is
added as an option, the foundation plan, first floor plan, first
floor framing, second floor plan, second floor framing, roof plan
etc. should have an option reflecting the changes that will be
made.
- When you are selecting objects to be added to the option, you
can limit the selection by using the object type, see Lock an Object
Type.
- If the option boxes are not visible in the floor plan drawing,
select
 Layers >
  All
Layers.
All
Layers.
- You can create sub options by adding an option to an existing
option box.
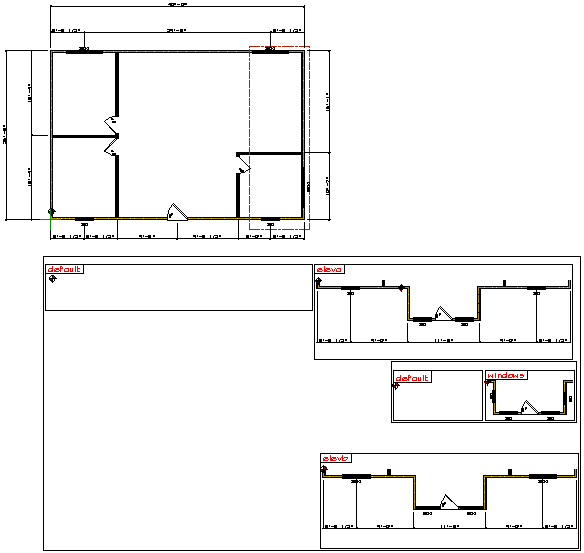
- The options can be anywhere in the drawing area. Below is an
example of a floor plan drawing where there are 3 elevation
options, one with two sub options, defined in the one drawing. Each
option has a fence around it and is far enough away from the
original base plan that notes and dimensions can be added.
 Options
Database
Options
Database
Editing Option Components
Option Insert Mode for
Components
Editing Option Data
Option System Functions