Example
Adding a Closed Log Wall Chain
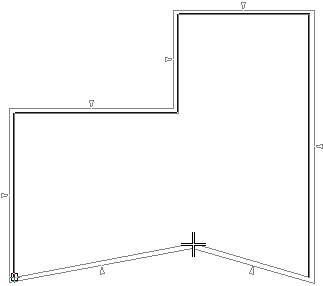
In this example, log walls are added to a 2D drawing.
- Activate the 2D drawing window.
- Select
 Walls > Add
Wall.
Walls > Add
Wall.
- If necessary, open the Wall dialog box by selecting
 Select another wall. Select the library Log
Walls and the selection group Log Wall.
Select another wall. Select the library Log
Walls and the selection group Log Wall.
- Select Parametric log wall, and select the log wall
parameters.
 Log Wall
Parameters
Log Wall
Parameters
- Click OK to close the dialog box. The selected wall structure
and default locating point are displayed on the status bar.

- Select
 Coarse representation from the
contextual toolbar.
Coarse representation from the
contextual toolbar.
- Change the locating point to
 Wall
inside.
Wall
inside.
- Select the first point.
Select the first point of the wall chain as the
origin point of the drawing. The origin point is marked on the
drawing with a green cross. Move the cursor near the origin and
click the left mouse button.

- Lock the cursor in the direction of the Y axis in one of the
following ways:
- Press the I key.
- Move the cursor in the direction of the Y axis until the cursor
looks like this
 and click
the left mouse button.
and click
the left mouse button.
- Select Constraint > Y axis from the context-sensitive
menu.
- Select the distance to the next point. Type the distance in the
Distance field of the Coordinates Input dialog box. The
dialog box will open when you press a numeric key on the keyboard.

- Select other points. Select the points, for example as follows:
- Constrain the cursor to the X axis and type 5000 as the
distance.
- Constrain the cursor to the Y axis and type 3000 as the
distance.
- Constrain the cursor to the X axis and type 4000 as the
distance.
- Constrain the cursor to the Y axis and select the start point
of the wall chain with the cursor, e.g., the origin in this
example.
 When you have constrained the cursor, move
it first in the direction in which you want to select the next
point. Next, type the distance between the points.
When you have constrained the cursor, move
it first in the direction in which you want to select the next
point. Next, type the distance between the points.
- Select
 Toggle open/closed wall.
- Select Confirm.
- Exit the function by pressing Esc.
 Add a Log
Wall
Add a Log
Wall