Framer

Setting Panel Attributes

In wall panel design, attribute data of the wall framing properties, such as the details, panel shape, sheathing shape, etc., are automatically linked to each panel. The data are read from the project parameters or the wall attributes. You can edit the default data by setting the desired attributes using this function. You can also add comments to the attributes, which will be displayed in the panel drawings generated later. Before setting the panel attributes, you need to generate the panel breaks.

  1. Select Classic Wall Panels > Panel Settings > Set Panel Attributes.
  2. Set the attribute data in the database view. You only need to select values for the parameters to be edited - the other parameter values are still read from the project parameters.

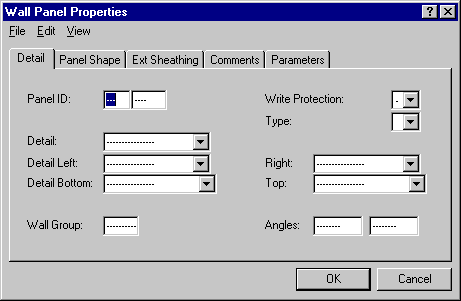
    On the first tab, Detail, you can select the wall ID and the framing details in customer-specific lists. Later, when generating, editing and saving panel drawings, you can write-protect the panel drawing, so that it cannot be deleted or regenerated from the floor plan drawing. You can deselect write protection by opening the panel attributes for editing and setting the Write Protection field value as "-".

    The Panel Shape tab displays the number of points on the lines depicting the top and bottom plates and their coordinates. Correspondingly, the Ext Sheathing tab shows the number and coordinates of the points on the top and bottom edge of the sheathing.

    On the Comments tab, you can select texts to be added to the panel drawing generated later.

    On the Parameters tab, you can make settings for panel studs and sheathing.

  3. Select the panels by clicking their center line.
  4. Select Confirm.
  5. Repeat steps 2 and 3, if necessary.
  6. Quit by pressing the Esc key.

Panel Settings

Converted from CHM to HTML with chm2web Pro 2.85 (unicode)