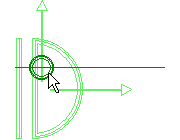
The program displays two symbols in the middle of the panel: the panel label zero point symbol (A) and the panel zero point symbol (B).

The symbols are overlapping.


|
Framer |
The default viewing direction of a front projection in a panel drawing is from the outside of the wall. The panel labels are added to the outside of the wall in a floor plan drawing. When generating the panel breaks, you can select the viewing direction from inside the wall by selecting the Interior view checkbox in the Wall Panelizing Settings dialog box. The panel labels are added to the inside of the wall in a floor plan drawing.
After generating the panel breaks, you can change the panel viewing direction as follows:

The program displays two symbols in the middle of the panel: the panel label zero point symbol (A) and the panel zero point symbol (B).

The symbols are overlapping.


| Converted from CHM to HTML with chm2web Pro 2.85 (unicode) |