

|
Framer |
Select Tool from the list. If necessary, edit the tool parameters in the dialog box. The parameters define the sheet sizes, sheathing method, where the sheathing starts, etc. The following sheathing tools are included in the basic software delivery:


Name, Description
Name and description of the tool. Presented in the Tool in the format "Description (Name)".
Rule
A rule may be one of the following:
Route Openings
Full Cover, No Opening Routing
Sheathing Seams at Opening Sides
Full Sheet at Both Sides of Opening
Cut at intersecting panels, no opening routing
Full sheet at both sides of opening, cut at intersecting panels
Layout direction
Select one of the following:
Follow Studs - The start point and direction of the studs are defined in the frame layer parameters.
From Left to Right - The panel is sheathed from left to right, regardless of the stud positioning of the frame layer.
From Right to Left - The panel is sheathed from right to left, regardless of the stud positioning of the frame layer.
Sheet Direction
Select a vertical or horizontal sheet from the list.
Studs
Select one of the following as the stud positioning rule:
Sheathing Follows Studs - The sheet seams are positioned according to the frame layer studs.
Sheathing Does Not Follow Studs - Sheathing with full sheets in the layout direction. The sheet seams are not placed according to the frame layer studs.
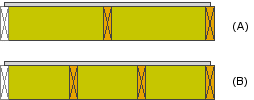
Sheet Generates Studs - Overrides the stud positioning in the frame layer parameters. The studs are positioned according to the sheet seams. Type the number of studs per sheet in the text field. For example, 2/sheet (A), 3/sheet (B).

Rotate
Select one of the following:
No Sheet Rotation - The sheets are always positioned according to the selected direction (vertical/horizontal).
Sheet Rotation at Wide Openings - Vertical sheets are rotated to the horizontal position at wide openings. Rotates a sheet when the height of the sheathing area is less than the sheet width.
Sheet Rotation on Narrow Walls - Rotates a sheet when the length of the panel is less than the shorter dimension of the sheet.
Edge Transition
This parameter is significant when there are two sheathing layers on top of each other. The transition value defines where the spacing of the second layer begins.
Clip Level
Defines the clip level of a sheet at the edge of the opening (position of the sheet edges in relation to the edges of the opening).
Sheet
Select a sheet from the list. The sheathing library may contain several sheets with the same material code but a different size (width x height). You can define one of the sheets as the default sheet to be used when paneling walls. If the default sheet has not been defined, the program selects a sheet best suited to the panel height.
You can define the default sheets by editing the
sheathing library with the function ![]() System
Settings > Framing Libraries > Sheathing. Set the default
sheet by selecting the value 1 in the Default field.
System
Settings > Framing Libraries > Sheathing. Set the default
sheet by selecting the value 1 in the Default field.
![]() The material and framing tool selected for
the sheathing layer in the wall properties affect the sheet. The
program checks the sheet of the framing tool when the panel breaks
area added. If the sheet of the framing tool is not equivalent to
the material of the layer, it is changed to match the material.
The material and framing tool selected for
the sheathing layer in the wall properties affect the sheet. The
program checks the sheet of the framing tool when the panel breaks
area added. If the sheet of the framing tool is not equivalent to
the material of the layer, it is changed to match the material.
| Converted from CHM to HTML with chm2web Pro 2.85 (unicode) |