Add Horizontal Wall Trims
With this function, horizontal wall trims are added to a wall.
The trims are added in the model. The wall trims are automatically
attached to the wall. When the trim boards have equal cross
sections, they are positioned at the same height, and their ends
are close to each other, the trims form miter joints at the
building corners.
- Activate the model window.
- Do either of the following:
- Select
 Trim Boards >
  Horizontal Wall Trim.
- Right-click to open the context-sensitive menu, and select
Trims > Horizontal Wall Trim.
- Select a method to select the wall from the contextual toolbar.
- Do one of the following:
- If you selected the method ONE, click a wall. Click several
walls by holding down the Ctrl key.
- If you selected the method CHAIN, click a wall which belongs to
the wall chain. The entire wall chain becomes selected.
- If you selected the method ALL, click any wall. All the walls
in the model become selected.
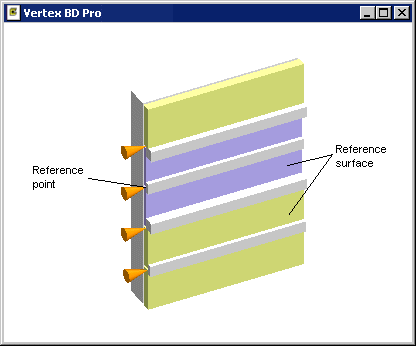
- Select Confirm. A wall model opens in a separate model
window. The reference points of the wall trims are displayed in the
model window.
- Select the reference surface, with relation to which the wall
trim will be positioned on the wall.
- Select the wall trim to be added. You can select several wall
trims to be added simultaneously. In this case, the position of the
wall trims in relation to each other will be the same on the wall
of the building as it is on the wall model.
- Select the position of the wall trim on the wall.
 Delete Horizontal
Wall Trims
Delete Horizontal
Wall Trims
Trim Boards